
As temperatures fluctuate, your home’s thermostat is the hub for regulating your home temperature, orchestrating your heating and cooling system as well as helping you save money and energy. So, when it comes to replacing your thermostat, there is a big decision – should you do it yourself? While the idea of a DIY thermostat replacement sounds cost-effective and a quick solution, it’s essential to understand the safety risks and ensure you have the proper tools and knowledge before attempting it. Here’s what you need to know about replacing your own thermostat while balancing your safety and budget.
Tabe of Contents
- 1. Understanding the Basic Function of Thermostats for Home Use
- 2. Pros and Cons of Replacing a Thermostat: Is it Worth the Risk?
- 3. Important Safety Precautions to Practice When Replacing Your Thermostat
- 4. How to Choose the Right Thermostat for Your Home and Lifestyle Needs
- 5. Step-by-Step Guide: How to Replace Your Thermostat Without Calling a Professional
- People Also Ask
- Conclusion
1. Understanding the Basic Function of Thermostats for Home Use
Before diving into the process of replacing a thermostat, it is important to understand the basic function of thermostats for home use. A thermostat is an essential component of any heating, ventilation, and air conditioning (HVAC) system. It helps in regulating the temperature in your home by sensing the current temperature and signaling to the HVAC system to either heat or cool the air to maintain a set temperature.
Thermostats can be broadly divided into two categories: programmable and non-programmable. A programmable thermostat gives you greater control over the temperature of your home and allows you to program it to different settings for different times of the day or week. On the other hand, non-programmable thermostats offer basic temperature control and do not have customizable settings.
It is important to note that thermostats do have a limited lifespan and may need to be replaced over time. Signs that your thermostat needs replacement can include inconsistent temperatures in your home, frequent cycling of the HVAC system, or a blank screen on the thermostat. However, before you replace your thermostat, it is important to weigh the pros and cons of doing so.
2. Pros and Cons of Replacing a Thermostat: Is it Worth the Risk?
There are both pros and cons to consider when deciding whether to replace your own thermostat. On one hand, DIY replacement can be a cost-effective solution that can save you time and money. However, it can also be risky and may result in damage to your heating and cooling system if not done correctly.
Some key pros to consider when it comes to DIY thermostat replacement include the ability to save money on professional installation fees and the satisfaction of doing the work yourself. Additionally, you may have more control over the type of thermostat you choose and the features it provides. This can be particularly helpful if you have specific needs or preferences that you want to cater to.
On the other hand, there are several cons to keep in mind when it comes to DIY thermostat replacement. One of the biggest risks is the potential for damage to your HVAC system if you make a mistake during installation. This can result in costly repairs down the line and may even compromise the efficiency of your system.
Another con to consider is the level of technical knowledge required to successfully replace a thermostat. While many homeowners may feel comfortable tackling this type of project, others may be unsure of how to properly wire the new thermostat or troubleshoot any issues that may arise.
Overall, the decision to replace your own thermostat comes down to weighing the potential pros and cons and assessing your own comfort level with DIY projects. If you do decide to tackle this task on your own, be sure to take appropriate safety precautions and carefully follow all installation instructions to minimize risk and maximize success.
3. Important Safety Precautions to Practice When Replacing Your Thermostat
Replacing a thermostat can be a rewarding and cost-effective DIY project, but it can also be dangerous if proper safety precautions are not observed. Here are some important safety tips to keep in mind when replacing your thermostat:
Turn off the power supply: Before handling any electrical wires, turn off the power supply to your HVAC system by flipping the circuit breaker. This prevents the risk of electric shock.
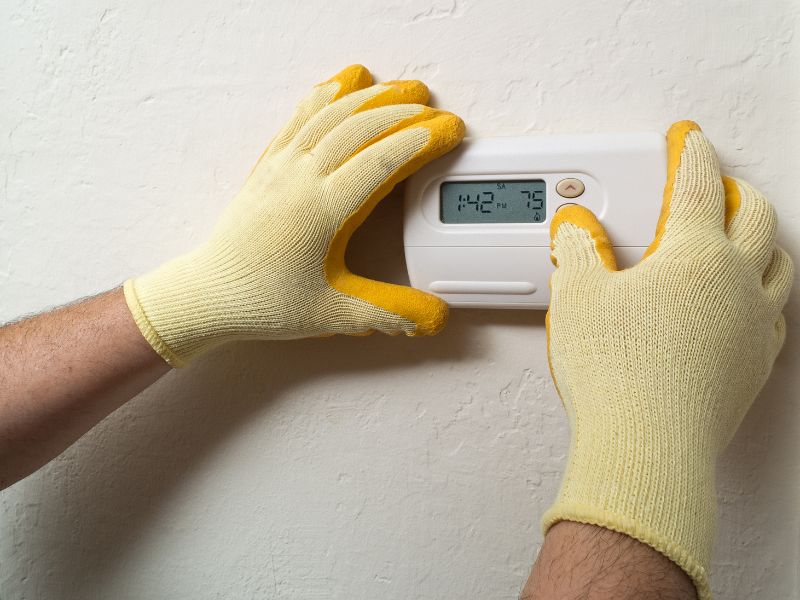
Wear protective gear: It is important to wear protective gear, such as gloves and safety glasses, when handling any sharp tools or electrical components.
Label the wires: Take a picture of the wiring configuration or label the wires with tape, so you know which wire goes where during the replacement process.
Use the right tools: Make sure to use the proper tools, such as wire strippers and pliers, to avoid damage to any wires or parts.
Dispose of old thermostat properly: Once the old thermostat is removed, dispose of it properly. Thermostats contain mercury, which can be harmful to the environment and should not be thrown in the trash. Check with your local recycling center for proper disposal methods.
By practicing these safety precautions, you can ensure a successful and safe replacement of your thermostat. However, if you are unsure or uncomfortable with any step in the process, do not hesitate to call a professional HVAC technician for assistance.
4. How to Choose the Right Thermostat for Your Home and Lifestyle Needs
Choosing the right thermostat for your home and lifestyle needs is a crucial decision to ensure that your HVAC system functions as efficiently as possible. In this section, we’ll explore factors that you should consider when choosing a new thermostat.
Firstly, it’s essential to understand the different types of thermostats available. The most common types of thermostats for home use include programmable, non-programmable, and smart thermostats. Programmable thermostats allow you to set temperature schedules throughout the day, whereas non-programmable ones require manual adjustments. Smart thermostats are Wi-Fi enabled and can be controlled remotely from your smartphone or tablet.
When considering which type of thermostat to choose, you’ll need to think about your daily routine. If you have a consistent work schedule, a programmable thermostat may be the best option for you. However, if your routine changes frequently, a smart thermostat may be more convenient, allowing you to adjust the temperature from your smartphone or tablet, no matter where you are.
The next factor to consider is compatibility. Before purchasing a new thermostat, you’ll need to ensure that it’s compatible with your HVAC system. Not all thermostats work with all types of HVAC systems, so it’s crucial to check that the new thermostat will work with your heating and cooling system. If you’re unsure, it’s best to seek professional advice.
In addition to compatibility, you’ll also need to consider additional features. Some thermostats offer advanced features such as voice control, geofencing, and learning algorithms that automatically adjust the temperature based on your preferences.
In conclusion, selecting the right thermostat for your home and lifestyle needs is essential to optimize the function of your HVAC system. Consider factors such as the type of thermostat, compatibility with your HVAC system, and additional features before making a purchase. By doing so, you’ll ensure that your HVAC system operates efficiently and effectively.
5. Step-by-Step Guide: How to Replace Your Thermostat Without Calling a Professional
Replacing a thermostat may seem like a daunting task, but with the right tools and knowledge, it can be done safely and easily. Here’s a step-by-step guide to help you replace your thermostat without calling a professional.
Step 1: Turn Off the Power
Before beginning any electrical work, it’s essential to turn off the power to your HVAC system. Go to your power panel and locate the circuit breaker that controls your HVAC system. Switch the breaker to the off position.
Step 2: Remove the Old Thermostat
Start by removing the cover of your existing thermostat. Carefully detach the wires from the old thermostat and mark which terminals they were connected to. This will help you connect the wires correctly to your new thermostat.
Next, unscrew the mounting plate from the wall and remove the old thermostat. Make sure to discard the old thermostat and mounting plate responsibly.
Step 3: Install the New Thermostat
Install the new mounting plate by aligning it with the existing holes on the wall. Secure the plate using screws. Connect the wires to the terminals of the new thermostat following the marks you made earlier.
Once all wires are connected, snap the cover of the new thermostat in place and turn the power back on.
Step 4: Program Your New Thermostat
Program your new thermostat according to the manufacturer’s instructions. Set the temperature and preferences that work best for your lifestyle and climate.
Congratulations, you have successfully replaced your thermostat without the help of a professional. Remember always to practice safety precautions when working with electrical components and installing a new thermostat.
People Also Ask
1. What are the risks of replacing a thermostat?
Replacing a thermostat can be risky if you do not have the proper training or experience. Incorrect installation or wiring can cause electrical shocks, short circuits, or even fire hazards.
2. Do I need a permit to replace a thermostat?
In most cases, replacing a thermostat does not require a permit. However, it is recommended to check with your local authorities or a licensed technician to make sure you comply with any regulations or safety standards in your area.
3. How much does it cost to replace a thermostat?
The cost of replacing a thermostat can vary depending on the type of thermostat, the complexity of the installation, and the location. Typically, it can cost between $50 to $500, including labor and materials.
4. Can I replace a thermostat myself?
If you have knowledge of electrical wiring and HVAC systems, it is possible to replace a thermostat yourself. However, if you are unsure or do not have experience with these systems, it is recommended to hire a licensed technician to avoid any safety risks or damage to your HVAC equipment.
5. What should I consider before replacing my thermostat?
Before replacing your thermostat, you should consider factors such as the compatibility with your HVAC system, the features you need, the wiring and installation requirements, and the energy efficiency rating. It is also important to check the warranty and return policy of the thermostat and any accessories you purchase.
Conclusion
Replacing a thermostat can be a DIY project, but it is not suitable for everyone. It is essential to consider the risks and requirements before attempting to replace a thermostat. If you have any doubts or concerns, it is always best to consult a licensed technician or HVAC professional to ensure your safety and avoid any damage to your equipment.

Emergency Services Coordinator
Oliver leads our round-the-clock emergency repair services. His swift response and problem-solving skills provide peace of mind during urgent AC breakdowns, making your comfort his priority.