
With summer approaching, you’ve probably cranked up your wall-mounted air conditioner to stay comfortable in the heat. But have you taken a close look at your AC unit lately? If it’s covered in dust and grime, it can’t work as efficiently as it should. Cleaning your wall AC unit might seem daunting, but with the right steps, it’s a straightforward process that can keep your AC blowing cool air all season long. In this article, we’ll take you through everything you need to know about how to clean a wall AC. Get ready to say goodbye to the dust bunnies and hello to an AC unit that runs like new!
Tabe of Contents
- 1. Gather the necessary tools and materials for cleaning a wall AC
- 2. Turn off the unit and remove the filter for cleaning
- 3. Clean the exterior of the unit to remove dirt and debris
- 4. Use a mild cleaner to clean the interior of the unit
- 5. Reinstall the filter and test the unit for functionality
- 6. Schedule regular cleaning and maintenance to keep your wall AC running smoothly
- How To Clean a Wall AC
- 7. Troubleshooting tips for common wall AC issues
- People Also Ask:
- Conclusion:
1. Gather the necessary tools and materials for cleaning a wall AC
How to Clean a Wall AC: Gather the Necessary Tools and Materials
Before you start cleaning your wall AC, make sure you have all the tools and materials you’ll need to complete the task efficiently. Here’s a list of items you should gather before you begin:
Tools:
- Screwdriver
- Soft-bristled brush
- Vacuum cleaner with a brush attachment
- Pliers
Materials:
- Clean water
- Mild detergent or cleaning solution
- Clean cloth or sponge
- New air filter
When choosing a cleaning solution, use a mild detergent or solution that won’t damage the internal components of the unit. Avoid using harsh chemicals or abrasive cleaners that can cause corrosion or damage to the unit.
If your wall AC is high up, you may want to use a ladder or stool to reach it safely. Make sure you have a stable and secure platform before climbing up to clean your unit.
Having all the tools and materials on hand will make the cleaning process easier and more efficient. With these handy tools at your disposal, you’ll be able to clean and maintain your wall AC so that it functions optimally all year round.
2. Turn off the unit and remove the filter for cleaning
Cleaning a wall AC is an essential part of maintaining the quality of air in your home. Follow these steps to effectively clean your wall AC. The first step is to turn off the unit and unplug it to ensure your safety. Before cleaning the AC, make sure to gather all the necessary tools and materials required for cleaning. This includes a soft brush, a vacuum cleaner, a bucket of warm water, a mild cleaning solution, and a clean cloth or rag.
Removing the filter
Once the unit is off and unplugged, the next step is to remove the filter. Most wall AC units have an easily accessible and removable filter located on the front of the unit. Simply slide out the filter by gently pulling it towards you. If you find that the filter is difficult to remove, refer to your user manual for specific instructions.
Cleaning the filter
After removing the filter, gently vacuum or brush off any loose debris and dirt. Next, fill a bucket with some warm water and add a mild cleaning solution to it. Soak the filter in the solution for 5-10 minutes. Rinse the filter with clean water to remove any excess dirt and detergent. Allow the filter to dry completely before reinstalling it back into the unit.
Additional tips
While cleaning the filter ensure that you don’t damage the delicate pleated mesh. Avoid using harsh chemicals or detergents that can cause damage to the filter. You can also use a soft brush to clean the filter instead of soaking it in a cleaning solution. Make sure the filter is completely dry before reinstalling it.
Cleaning your wall AC is a necessary and straightforward process that should be done regularly, especially during the summer months when the AC unit is in regular use. By following these steps, you’ll ensure that your unit runs efficiently and provides cool, clean air throughout your home.
3. Clean the exterior of the unit to remove dirt and debris
Cleaning the exterior of your wall AC is just as important as cleaning its interior. Dirt and debris can accumulate on the outside and reduce the efficiency of the unit, resulting in higher energy bills and more wear and tear on the machine. Follow these steps to clean the exterior of your wall AC:
1. Turn off the unit: Before you start cleaning the exterior of the unit, make sure to turn off the power supply. This will prevent any accidents or potential problems from occurring while you’re cleaning.
2. Remove debris: Use a soft-bristle brush or a vacuum cleaner to remove any debris that might have accumulated on the outer surface of the unit. Debris such as leaves, pollen, or dust can block airflow to the unit and reduce its efficiency.
3. Wash the exterior: Use a mild detergent, warm water, and a soft cloth to scrub the exterior of the unit. Be careful not to damage any of the components of the unit while cleaning. Avoid using harsh chemicals, abrasive materials, or high-pressure washers.
4. Inspect the unit: After cleaning the exterior, inspect the unit for any cracks, leaks, or other damage. Check that all of the screws, bolts, and other fasteners are tight and secure. Replace any damaged parts or call a professional if you notice anything that needs attention.
Remember, regular cleaning and maintenance are essential to keep your wall AC running efficiently. Consult your owner’s manual or a professional technician to determine the recommended frequency for cleaning and maintenance.
4. Use a mild cleaner to clean the interior of the unit
It is essential to keep the interior of your wall-mounted air conditioner clean to prevent the accumulation of dust, grime, and other debris. Using a mild cleaner is an effective way to achieve this.
Tools and materials for cleaning the interior of the unit
- Vacuum Cleaner with a soft brush attachment
- Spray Bottle
- Mild Detergent or Cleaner
- Clean Cloth or Microfiber Towel
To clean the interior of your wall-mounted air conditioner, follow the steps below:
1. Power off the unit – ensure that the unit is turned off and unplugged before you start cleaning to prevent the risk of electrical shock.
2. Remove the front cover and filter – remove the front cover and filter from the unit to enable you to clean the interior.
3. Vacuum the interior – use a vacuum cleaner with a soft brush attachment to remove dust and debris from the interior of the unit. Take extra care not to damage the fins or any delicate parts while you do this.
4. Use a mild cleaner – dampen a clean cloth with a mild detergent or cleaner and wipe the interior surfaces of the unit. Do not use abrasive cleaners or cleaners with harsh chemicals to avoid damaging the unit.
5. Clean the filter – use a vacuum cleaner or a soft brush to clean the filter. Alternatively, you can wash it with water and mild soap, then allow it to dry completely before reinstalling it.
By following these steps, you can keep the interior of your wall-mounted air conditioner clean and functioning effectively. Remember always to carry out regular cleaning to extend the lifespan of your unit and prevent possible technical issues.
5. Reinstall the filter and test the unit for functionality
After cleaning the interior of the wall AC, it’s time to . Reinstalling the filter is crucial, as it prevents dust and debris from entering the unit and affecting its performance. Testing the unit ensures that it’s running smoothly and efficiently.
Reinstalling the filter
To reinstall the filter, follow these steps:
- Remove the filter from where it was placed earlier
- Clean the filter with a vacuum cleaner or wash with warm and soapy water (if reusable)
- Wait for the filter to dry completely
- Insert the filter back into the unit, making sure that it’s properly aligned and secure.
Testing the wall AC for functionality
After reinstalling the filter, turn on the wall AC and let it run for a while. Check if it’s blowing cool air and if the air flow is as expected. Ensure that there’s no unusual noise or vibration coming from the unit. If you notice any issues, turn off the unit immediately and check for any loose or damaged parts.
If everything seems normal, also check for any leaks around the unit or any signs of moisture. If you notice any of these issues, get professional help immediately.
Regularly cleaning and maintaining your wall AC can prolong its lifespan and ensure that it runs efficiently. Always follow the manufacturer’s instructions for cleaning and maintenance to avoid damage to the unit.
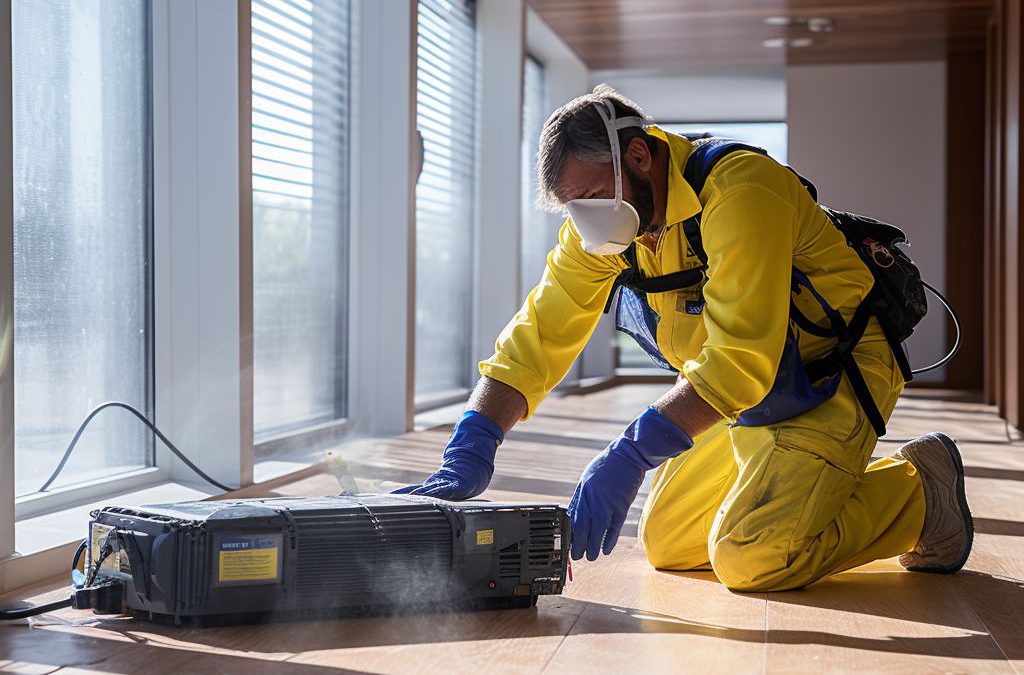
6. Schedule regular cleaning and maintenance to keep your wall AC running smoothly
How To Clean a Wall AC
Regular cleaning and maintenance of your wall-mounted air conditioning unit can help keep it running efficiently and effectively. Scheduling periodic cleaning can help prevent dirt and debris build-up which can cause the unit to work harder, use more energy, and ultimately lead to costly repairs. Here are a few tips for maintaining your wall AC:
Create a cleaning schedule
Start by creating a cleaning schedule that works for you. Depending on the usage and the environment of your wall AC’s location, you may need to clean it more often. For instance, if the unit is in a dusty or high traffic area, you may need to clean it once a month. If it’s in a less occupied room or less frequented area, cleaning it every 3-4 months might be sufficient.
Clean or replace the filter
The filter is the primary defense against dirt, dust, and other airborne contaminants that can accumulate inside the unit. Clean the filter regularly or replace it at least every two to three months, depending on use and the quality of the filter. Blocked or dirty filters not only reduce the airflow, but can also impact the efficiency of the unit.
Hire a Professional
While cleaning the exterior and filter of your wall AC is a DIY task, some cleaning and maintenance tasks may require professional help. A professional HVAC technician can check the motors and other components, lubricate any movable parts, and identify any issues that need repair or replacement. Make sure to schedule a yearly or bi-annual maintenance visit from a professional.
With regular cleaning and maintenance, your wall AC can keep you and your home comfortable for years to come. Don’t neglect the maintenance of your wall AC and enjoy the benefits of a clean and energy-efficient cooling system.
7. Troubleshooting tips for common wall AC issues
Even with regular cleaning and maintenance, your wall AC may still develop issues over time. Here are some common problems that you may encounter and what you can do to troubleshoot them.
Leaking water
If you notice water pooling around your wall AC unit, it may indicate a clogged drain line. Start by turning off the unit and unplugging it from the power source. Locate the drain line at the base of the unit and use a wet/dry vacuum to suck out any debris or dirt that may be causing the blockage. Once the line is clear, pour a mixture of equal parts vinegar and water through the line and let it sit for a few minutes before flushing it out with water.
Strange noises
If your wall AC is making unusual noises, it may be a sign of a loose or worn-out part. Turn off the unit and check the fan blades and motor for any visible damage or signs of wear and tear. If everything looks okay, try tightening any loose components that may be causing the noise. If the problem persists, it may be best to call a professional for assistance.
Weak airflow
If your wall AC is not blowing enough cool air, it may be due to a clogged filter or evaporator coil. Remove the filter and clean it thoroughly before reinstalling it. If the filter is still in good condition, check the evaporator coil for any dirt or debris and clean it with a soft brush or cloth. If neither of these solutions works, it may be a sign of a more serious issue, and you may need to call a professional for help.
Remember, regular cleaning and maintenance can go a long way in preventing and troubleshooting common wall AC issues. Keep your unit running smoothly by following the tips outlined in this article.
People Also Ask:
1. Can I clean my wall AC myself?
Yes, you can clean your wall AC yourself as it is a DIY task. It requires a few tools and cleaning solutions to get started. But if you are unsure about your cleaning skills, it is better to seek professional help.
2. What is the recommended cleaning frequency for wall ACs?
It is recommended to clean your wall AC at least once every three months to prevent dirt buildup, reduce energy bills, and ensure prolonged lifespan.
3. What cleaning solution should I use to clean a wall AC?
You can use a mix of water and mild detergent to clean your wall AC. Alternatively, you can use vinegar and water, or bleach and water solution to remove stubborn dirt.
4. What tools do I need to clean a wall AC?
You need a few tools such as a soft brush, vacuum cleaner with a brush attachment, cleaning cloths, cleaning solution, and a water hose or spray bottle.
5. What steps should I follow to clean a wall AC?
The steps include turning off the AC and unplugging it, removing the front grille and filter, vacuuming the interior, washing the filter, cleaning the coils, scrubbing the exterior, and reinstalling the filter and grille.
Conclusion:
Cleaning your wall AC is not only for aesthetic purposes, but it also extends the lifespan of your unit and reduces your energy bills. With the right tools and cleaning solution, you can do the job yourself. However, if you are unsure, you can seek professional assistance. Cleaning your wall AC at least every three months is recommended to keep it running efficiently.

AC Repair Expert
Isaac’s expertise lies in diagnosing and rectifying AC unit issues swiftly and accurately. His goal is to restore your system’s functionality promptly and efficiently.