
A thermostat is a small device with a significant responsibility. It plays an important role in regulating your home’s temperature, keeping you and your family comfortable throughout the season. However, before you start using it, it’s essential to know how it should be installed correctly.
Installing a thermostat is not rocket science, but it’s vital to follow certain guidelines to ensure its proper functioning, and this article will guide you through the step-by-step process of installing a thermostat. Whether it’s your first time or you’re looking to replace an old one, keep reading to learn how to install a thermostat like a pro.
Tabe of Contents
- Understanding the Importance of Proper Thermostat Installation for Your Home
- Essential Tools and Supplies Needed for a Successful Thermostat Installation
- Step-by-Step Guide to Wiring and Mounting Your Thermostat
- Troubleshooting Common Issues During Thermostat Installation
- Selecting the Best Location for Optimal Thermostat Performance
- Maintenance Tips to Keep Your Thermostat Running Smoothly
- Benefits of Hiring a Professional to Install Your Thermostat
- People Also Ask
- Conclusion
Understanding the Importance of Proper Thermostat Installation for Your Home
Installing a thermostat in your home is an easy way to enhance your comfort level, improve energy efficiency, and reduce costs. However, it’s important to understand that a proper thermostat installation is crucial to ensure optimal performance. A poorly installed thermostat can lead to inaccurate readings, system errors, and higher energy bills.
A successful thermostat installation begins with a thorough understanding of your HVAC system and its wiring. HVAC systems come in different types, such as heat pumps, forced air furnaces, and radiant heating systems. Each system requires wiring and configuration unique to its type. Thus, before installing a thermostat, it’s essential to identify your HVAC system type and specify the compatible thermostat.
Moreover, a successful thermostat installation is achieved by following a step-by-step guide, using essential tools, and paying attention to detail. Proper mounting, wiring, and configuration are critical to the thermostat’s performance, accuracy, and durability. Additionally, selecting the right location for the thermostat and performing regular maintenance will ensure optimal functionality.
Overall, understanding the importance of proper thermostat installation is vital to improve your home’s comfort level, energy efficiency, and cost savings. This article will provide you with essential tips and guidelines for a successful thermostat installation and maintenance.
Essential Tools and Supplies Needed for a Successful Thermostat Installation
Before beginning your thermostat installation, make sure you have all the essential tools and supplies needed for a successful installation. Here are some of the tools and supplies you need for a thermostat installation:
Tools Needed:
- Drill
- Screwdriver (flathead and Phillips head)
- Pliers
- Wire cutter/stripper
- Level
- Tape measure
Supplies Needed:
- Thermostat (make sure it is compatible with your HVAC system)
- Mounting screws and anchors
- Wire labels or masking tape
- Wire connectors
When selecting a thermostat, make sure you choose one that is compatible with your HVAC system. Some systems may only work with specific thermostats, so be sure to check before purchasing. It’s also important to read the installation instructions that come with your thermostat. These instructions will provide specific details about wiring and mounting your thermostat.
Proper preparation is key to a successful thermostat installation. By having all the required tools and supplies ready, you can ensure that the installation process will be smooth and efficient. Be sure to read the installation instructions carefully to avoid any mistakes that could cause damage to your HVAC system.
Step-by-Step Guide to Wiring and Mounting Your Thermostat
Proper wiring and mounting are two crucial aspects of thermostat installation. Incorrect wiring or mounting can lead to malfunctioning of thermostats, which can eventually affect the efficiency of your HVAC system. This section of the article will provide a .
Step 1: Turn off the Power
Before you start wiring your thermostat, make sure to turn off the power supply to the HVAC system. This will ensure safety during the installation process.
Step 2: Remove the Old Thermostat
If you’re replacing an old thermostat, remove it from the wall and disconnect the wires attached to it. Make sure to note the color-coding of the wires, as this will help you to connect the wires to the new thermostat.
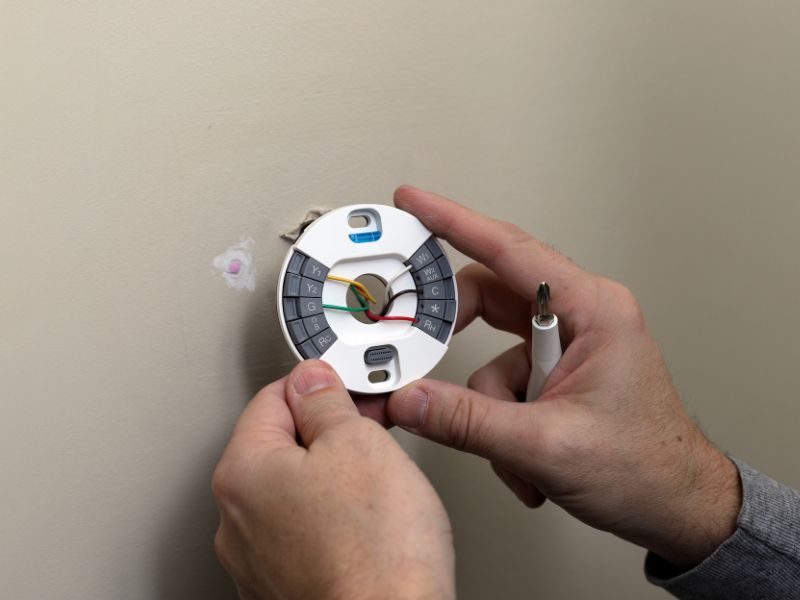
Step 3: Mount the New Thermostat
Mount the new thermostat to the wall using screws or adhesive strips. Make sure to select a location that is away from direct sunlight, drafts, and other sources of heat or cold. This will ensure accurate temperature readings.
Step 4: Connect the Wires
Connect the wires to their respective terminals on the new thermostat. Most thermostats come with a wiring diagram, which can help you to connect the wires correctly. Make sure that the wires are connected securely to avoid any loose connections.
Step 5: Test the Thermostat
Once you have completed the wiring and mounting process, turn on the power supply to test the thermostat. Check if all the functions are operable and if the thermostat is displaying the correct temperature.
By following these steps, you can successfully wire and mount your thermostat. However, if you’re unsure about the installation process, it’s always advisable to hire a professional HVAC technician to help you with this task.
Troubleshooting Common Issues During Thermostat Installation
Installing a thermostat may seem like an easy job, but sometimes, it may encounter common issues that affect its performance. Here are some of the common problems and solutions that you may encounter during thermostat installation:
1. No power to the thermostat: If you turn on the thermostat, and it doesn’t power up, it means there is no electrical connection. Check if the thermostat is wired and mounted correctly. Also, check if the furnace, air conditioner, or heat pump is receiving power. Once you locate the problem, turn off power to the unit and proceed to repair or replace the wires.
2. Thermostat not communicating with HVAC system: If your HVAC system does not respond to the thermostat commands, it means that the thermostat is not communicating with the system. Check if the wires connecting the thermostat to the HVAC system are secured and connected correctly. Also, check if the thermostat is compatible with the HVAC system. If the problem persists, contact an HVAC technician for further diagnosis and repair.
3. Inaccurate temperature readings: An inaccurate temperature reading may be caused by calibration, positioning, or placement issues. Ensure that the thermostat is mounted on a level surface, away from drafts, direct sunlight, and heat sources. Also, calibrate the thermostat according to the manufacturer’s instructions. If the problem persists, contact an HVAC technician for further diagnosis and repair.
If you encounter any of these issues or face other installation difficulties, review the manufacturer’s installation manual and follow the instructions carefully. It’s essential to check and recheck the wiring and mounting before turning on power to avoid damaging the thermostat.
Selecting the Best Location for Optimal Thermostat Performance
Selecting the right location for your thermostat is crucial if you want to ensure optimal performance and accurate readings. Here are some tips to help you choose the best location for your thermostat.
Avoid Drafty Areas
One of the most important things to keep in mind when selecting a location for your thermostat is to ensure that it’s not located in a drafty area. Placing the thermostat near a drafty door or window can cause inaccurate temperature readings and make your HVAC system work harder than it needs to. Instead, choose a location that’s away from drafts and temperature fluctuations.
Keep Away from Heat Sources
Another factor to consider when selecting a location for your thermostat is to keep it away from heat sources. Placing it next to a lamp, TV or other heat-emitting appliances can interfere with accurate temperature readings and affect your home’s comfort level. To ensure optimal performance, keep your thermostat at least two feet away from any heat sources.
Central Location
Finally, it’s always a good idea to choose a central location for your thermostat. This will ensure that it can accurately measure the temperature in all areas of your home. Avoid placing your thermostat near the kitchen or bathroom, as the steam and humidity can cause inaccurate readings.
By following these tips, you can ensure that your thermostat is installed in the best location for optimal performance and accuracy. Remember, proper thermostat installation is key to keeping your home comfortable and energy-efficient.
Maintenance Tips to Keep Your Thermostat Running Smoothly
Proper maintenance of your thermostat is essential in keeping it functioning well and preventing it from breaking down. Here are some tips to help you maintain your thermostat.
Replace the Batteries Regularly
One of the easiest ways to keep your thermostat running smoothly is by changing the batteries once or twice a year. You can check the manufacturer’s manual for the recommended battery for your thermostat. Most thermostats have low battery indicators, so once the indicator comes on, you should replace the batteries without delay. Neglecting to change the batteries can result in your thermostat malfunctioning, which can cause a lot of problems.
Clean the Thermostat
Dust and dirt accumulation can cause the thermostat to malfunction. Therefore, you need to clean it regularly. You can use a soft-bristled brush or a can of compressed air to clean the thermostat. Ensure you clean the screen, buttons, and surroundings. If you notice any dirt or grime sticking to the display screen, you can use a microfiber cloth or a damp cloth to wipe it clean.
Check the Wiring
It’s important to check the wiring and connections of your thermostat from time to time to ensure they are tight and secure. Loose wires or connections can cause your thermostat to malfunction or stop working altogether. If you’re not familiar with thermostat wiring, it’s best to call in a professional to check the connections and tighten any loose wires.
With these maintenance tips, your thermostat can last for years and keep your home comfortable all year round. However, if you experience any issues with your thermostat despite your maintenance efforts, it’s advisable to call in a professional technician to diagnose and fix the problem.
Benefits of Hiring a Professional to Install Your Thermostat
Installing a thermostat may seem like a straightforward task, but it requires technical knowledge and expertise. While DIY installations may save you money, they come with a range of risks and drawbacks. It is advisable to hire a professional to install your thermostat to ensure optimal efficiency, safety, and durability.
Here are some of the benefits of hiring a professional:
1. Proper installation: A professional HVAC technician has the necessary training and experience to install your thermostat correctly. They know how to connect the wires correctly, set up the system, and ensure that everything is functioning correctly.
2. Risk prevention: Installing a thermostat is a challenging task that requires knowledge of electrical wiring and technical expertise. Allowing a professional HVAC technician to install your thermostat reduces the risk of electrical hazards, fire, and other safety issues.
3. Enhances efficiency: A properly installed thermostat helps you save energy, lower your energy bills and increase your home’s comfort. Professionals understand how to install the thermostat correctly to ensure maximum efficiency and optimize your HVAC system’s performance.
4. Professional advice: An HVAC professional can provide you with valuable advice on thermostat selection, placement, and settings to help you make the most of your unit.
5. Saves money in the long term: Hiring a professional HVAC technician may seem like an additional expense, but it can save you money in the long run. With a correctly installed thermostat, your energy bills will be lower, and your HVAC system will last longer, reducing the need for frequent repairs and replacements.
In conclusion, a professional HVAC technician is essential for a successful thermostat installation. Besides ensuring the correct installation and system efficiency, you will reduce the risk of hazards and save money in the long term. Consider hiring a professional to help you install, maintain, and optimize your thermostat for optimal performance and comfort.
People Also Ask
1. Can I Install a Thermostat Myself?
Yes, you can install a thermostat yourself, but it’s essential to follow the instructions provided by the manufacturer. It’s also important to turn off the power to your heating and cooling system before making any changes.
2. Where Should I Install My Thermostat?
Thermostats should be installed on an interior wall, away from direct sunlight, drafts, and appliances that generate heat. The ideal height for installation is eye level or slightly higher.
3. How Do I Know If My Thermostat Is Compatible with My HVAC System?
The best way to ensure compatibility is to choose a thermostat designed for your specific HVAC system. Check the manufacturer’s specifications to find out what types of systems the thermostat can control.
4. Do I Need to Seal Holes Around My Thermostat?
If there are any gaps between the wall and the thermostat, it is recommended to seal them to prevent drafts and temperature changes from affecting the readings. Use caulking or foam insulation to seal any gaps.
5. What Are Common Mistakes When Installing a Thermostat?
Common mistakes when installing a thermostat include wiring it incorrectly, installing it in an inappropriate location, not calibrating it correctly, and not turning off the power to the HVAC system beforehand.
Conclusion
Installing a thermostat may seem like a simple task, but it’s important to read the instructions carefully and take the necessary precautions to avoid common mistakes that can lead to system malfunctions or inaccurate temperature readings.
Choosing the right location, sealing any gaps, and ensuring compatibility with your HVAC system are key factors for a successful installation. If you’re unsure about any step, it’s best to consult with a professional.

Bobby leads Air Conditioners Contractors with a vision for innovation and excellence in the HVAC industry. With a passion for customer satisfaction and a drive for technological advancement, he ensures the company remains at the forefront of delivering top-tier air conditioning solutions across the USA. His leadership fosters a culture of dedication, expertise, and commitment to exceeding client expectations.