
Have you ever considered installing a DIY geothermal system in your home but were deterred by the cost? Geothermal energy is an alternative and sustainable source of energy that can help you save on your monthly electricity bills. However, it’s essential to consider how much it costs to install and maintain a geothermal system before making the investment. In this article, we’ll explore the cost of DIY geothermal, its benefits, installation process, and the maintenance required to help you decide whether this sustainable energy solution is worth the investment.
Tabe of Contents
- 1. Introduction: Exploring the World of DIY Geothermal Heating
- 2. Benefits of DIY Geothermal Heating: Cost Savings and Environmental Advantages
- 3. Factors Affecting the Cost of DIY Geothermal Heating Systems
- 4. DIY Geothermal vs Conventional Heating: Which is More Cost-Effective?
- 5. How to Calculate the Cost of a DIY Geothermal System
- 6. Tips for Keeping Costs Low While Building a DIY Geothermal Heating System
- 7. DIY Geothermal Maintenance: Minimizing Costs and Maximizing System Lifespan
- People Also Ask:
- Conclusion:
1. Introduction: Exploring the World of DIY Geothermal Heating
Geothermal heating and cooling systems have been gaining popularity in recent years due to their energy efficiency and environmental friendliness. However, professional installation can come with a hefty price tag, which has led many homeowners to consider DIY geothermal options.
DIY geothermal heating systems involve tapping into the earth’s natural heat to provide warmth to your home during winter months and cooling during the summer. The DIY approach allows homeowners to save money on installation costs and can result in significant long-term savings on energy bills.
But, how much does DIY geothermal actually cost? This article will explore the factors that affect these costs, how to calculate them, and tips for keeping costs low while building and maintaining a DIY geothermal system.
2. Benefits of DIY Geothermal Heating: Cost Savings and Environmental Advantages
Geothermal heating has increasingly become a popular option for homeowners seeking a cost-effective and sustainable alternative to conventional heating. DIY geothermal heating systems can help save up to 70% on energy costs and significantly reduce carbon emissions, making it a wise investment in both your household budget and environmental conservation efforts.
Cost Savings
One of the biggest benefits of DIY geothermal heating is its cost-effectiveness. While the initial setup cost may seem like a significant investment, homeowners can save valuable money on energy bills with time, making it well worth the initial expense. Unlike conventional heating systems that require frequent fuel replenishing, geothermal heating is powered by the sun’s energy, which is renewable and free.
Additionally, geothermal heating systems have a lifespan of up to 25 years, which means homeowners can continue to enjoy the cost savings that it provides for a long time. The only regular expense associated with geothermal heating is the necessary maintenance, which is considerably less than the cost of maintaining a traditional heating system.
Environmental Advantages
DIY geothermal heating offers significant environmental benefits as well. Traditional heating systems run on fossil fuels, which emit harmful pollutants into the environment, jeopardizing air quality. In contrast, geothermal heating is an environmentally-friendly option that produces minimal greenhouse gas emissions.
Moreover, geothermal heating requires less electricity to operate, which means it reduces dependence on grid energy. This results in fewer power outages and reduced demand for fossil fuel, potentially decreasing the stress on the energy grid and creating an affordable, accessible, and sustainable energy future.
Overall, DIY geothermal heating provides numerous environmental and financial benefits that make it a smart investment for homeowners seeking to save money on their heating bills while reducing their carbon footprint.
3. Factors Affecting the Cost of DIY Geothermal Heating Systems
Before embarking on a DIY geothermal heating project, it’s important to have an understanding of the various factors that can affect the overall cost. These factors can include:
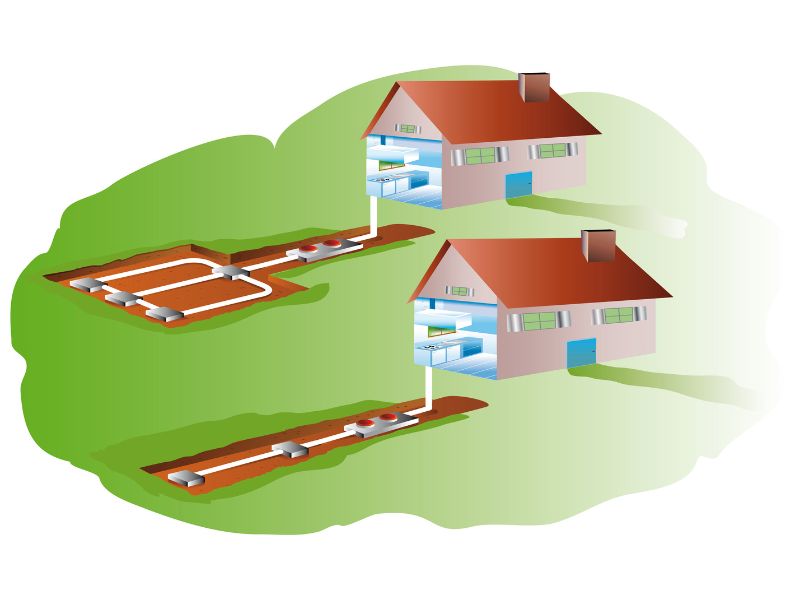
Type of System
There are a variety of geothermal heating systems to choose from, including closed-loop systems, open-loop systems, and hybrid systems. The type of system you choose can have a significant impact on the overall cost of the project. Closed-loop systems tend to be more expensive upfront, but they require less maintenance in the long run.
Size of Property
The size of your property will also play a role in determining the cost of a DIY geothermal heating system. Larger properties may require more equipment and a larger loop field, which can increase the overall cost. However, larger properties may also benefit more from the cost savings associated with geothermal heating.
Ground Conditions
The condition of the ground on your property can also affect the cost of a DIY geothermal heating system. Excavation costs can vary based on the type of soil on your property and the amount of rock that needs to be removed. If the soil conditions on your property are unfavorable, it may increase the cost of the project.
By taking into account these factors and properly calculating the cost of a DIY geothermal heating system, homeowners can assess the affordability of the project and determine if it’s the right choice for their property and budget.
4. DIY Geothermal vs Conventional Heating: Which is More Cost-Effective?
When it comes to heating your home, conventional systems are often the go-to choice for homeowners due to their affordability and ease of installation. However, with the rise of DIY geothermal heating systems, homeowners are starting to explore this alternative heating option. But which is more cost-effective in the long run?
DIY Geothermal Heating System Costs
While DIY geothermal systems require a higher initial investment than conventional heating methods, they offer long-term cost savings. On average, a DIY geothermal system costs between $10,000 and $20,000 to install, depending on the size of the home and the complexity of the system. However, they can lead to energy savings of up to 70% and pay for themselves in as little as 5-10 years.
Conventional Heating System Costs
Conventional heating systems require less money to install upfront, with most systems costing between $2,500 to $7,500. However, they are not as energy-efficient as geothermal systems and require routine maintenance and replacement costs for parts such as air filters and burners. These costs can add up over time, making conventional heating systems more expensive in the long run.
The Verdict
Overall, DIY geothermal heating systems are more cost-effective in the long run than conventional heating systems. While the initial investment may be higher, geothermal systems offer significant energy savings and a longer lifespan, with less maintenance costs than conventional systems. Not to mention, they are an environmentally friendly and sustainable option that will benefit both your wallet and the planet in the long run.
5. How to Calculate the Cost of a DIY Geothermal System
Calculating the cost of a DIY geothermal heating system can be complex, but it’s an essential step to ensure the project falls within your budget. Keep in mind that the cost of a geothermal system varies depending on your location, the size of the system, and the type of system you install.
Step 1: Determine the Size of Your System
The first step to calculating the cost of a DIY geothermal system is to determine the size of the system you’ll need. A system that is too small will not effectively heat or cool your home while a system that is too large will drive up your initial investment and energy usage. Calculate this by considering
[1]:
- The square footage of the space to be heated and cooled
- The energy efficiency of your home’s envelope
- The regional climate
Step 2: Choose a Type of Geothermal System
Next, choose the type of geothermal heating system that suits your needs. The options include a closed-loop system (horizontal or vertical), open-loop system, and hybrid system. Each has different pros and cons and will affect your budget differently.
Step 3: Calculate the Cost of Materials and Installation
Lastly, determine the cost of materials and installation. A geothermal system requires various components such as a heat pump, heat exchanger, ductwork, and more. Furthermore, a DIY approach to the installation may require additional tools and equipment that you don’t have.
Be sure to get multiple quotes from reputable contractors and suppliers and compare them against your budget. Remember, the cost saving benefit of a DIY geothermal system may be negated if additional expenses or mistakes drive up the final price.
Overall, calculating the cost of a DIY geothermal system requires careful consideration and research. Follow these steps and seek professional guidance to ensure a successful and cost-effective project.
6. Tips for Keeping Costs Low While Building a DIY Geothermal Heating System
Switching to a DIY geothermal heating system is a smart investment, but it can also be an expensive one if you are not careful with your spending. If you want to enjoy the cost-saving benefits of a geothermal system, consider these tips to keep your expenses low while building your own system.
1. Choose the Right Location and Layout
The location and layout of your geothermal heating system play a significant role in determining its cost. To keep your expenses low, choose a location that has easy accessibility to the underground loops and is close to your home’s heating and cooling system. Additionally, the design of your house can affect the cost of the project. A more compact and efficient home will require a smaller geothermal heating system, which means lower expenses.
2. Source Affordable Materials and Equipment
The quality and cost of the materials and equipment you use in building your DIY geothermal heating system affect your expenses. You can save a lot of money by sourcing affordable, high-quality parts and equipment. You can explore different supply companies and find the most affordable options. You can also look out for deals, discounts, or take advantage of the seasonal sales to buy needed equipment at a lower price.
3. Use DIY Skills or Hire Local Contractors
Building a DIY geothermal heating system requires technical knowledge, skills and experience. You need to have the right skills to install and assemble the heating and cooling components correctly. If you do not have the technical knowledge or skills, you may have to hire a contractor. However, hiring a geothermal HVAC contractor can be expensive. Alternatively, you can learn the technical knowledge and expertise needed to build the system from tutorials and guides online, or hire a local contractor.
By following these tips, you can save money while building a DIY geothermal heating system without compromising on quality and efficiency.
7. DIY Geothermal Maintenance: Minimizing Costs and Maximizing System Lifespan
One of the biggest advantages of a DIY geothermal heating system is the minimal maintenance required compared to traditional heating systems. However, regular maintenance is still necessary to ensure optimal performance and extend the lifespan of the system, which can ultimately save you money in the long run. Here are some tips to help you minimize maintenance costs and maximize the lifespan of your DIY geothermal heating system:
1. Change the Air Filter Regularly
The air filter plays a critical role in ensuring that your geothermal system functions properly. A dirty or clogged filter can reduce the efficiency of your system, which can lead to higher energy bills and potential system failures. Check your filter every few months and change it as needed, or at least once a year.
2. Inspect the System Annually
Even though DIY geothermal heating systems require minimal maintenance, it’s still a good idea to perform an annual inspection to identify any potential issues early on. Hire a professional to inspect the system and ensure that it’s running smoothly. During the inspection, the professional should check the refrigerant levels, electrical connections, and overall performance of the system.
3. Perform Routine Maintenance
Performing routine maintenance can help prevent major issues from developing, which can save you money in the long run. This can include flushing the system to remove any debris, testing the pump and motor, and checking the ductwork for leaks.
By following these tips, you can minimize costs and maximize the lifespan of your DIY geothermal heating system. Regular maintenance not only ensures optimal performance but also helps identify potential issues before they become major problems. Remember to consult your manufacturer’s guidelines and work with a professional if you’re unsure how to perform any maintenance tasks.
People Also Ask:
1. Is DIY Geothermal cheaper?
Yes, DIY geothermal systems are generally cheaper than having a professional install one. However, it requires a considerable amount of time and effort on the part of the homeowner.
2. How difficult is it to install a DIY Geothermal system?
Installing a DIY geothermal system is a complex process that requires a fair amount of technical know-how. It may be challenging for inexperienced homeowners to tackle the project on their own.
3. What materials are required for DIY Geothermal installation?
The materials required for a DIY geothermal installation include the geothermal heat pump, ground loop piping, fittings, insulation, and a control system. These materials can be purchased from any reputable HVAC supplier.
4. How much can I save by installing a DIY Geothermal system?
The savings from a DIY geothermal system depend on factors such as the size of the home, the energy efficiency of the home, and the price of electricity in the area. However, homeowners can expect to save anywhere from 30-70% on their energy bills.
5. Can I get rebates for installing a DIY Geothermal system?
Many states and utility companies offer rebates for homeowners who install geothermal systems. These rebates can help offset the cost of the installation and make it more affordable for homeowners.
Conclusion:
DIY geothermal systems can be a cost-effective way to heat and cool your home, but they require a significant amount of time, effort, and technical know-how. While the cost of installation can vary, homeowners can expect to save anywhere from 30-70% on their energy bills. Additionally, homeowners may be eligible for rebates and incentives that can help offset the cost of installation.

Senior HVAC Technician
With over 15 years in the HVAC industry, Lucas specializes in diagnosing intricate AC system issues. His commitment to precision and thoroughness ensures every repair restores optimal functionality to your cooling systems.