
If you’re planning on buying a new thermostat for your home or office, you may be wondering how many wires you’ll need to install it. The answer to this question can vary depending on the type of thermostat and your heating and cooling system. Understanding the types of wiring you may need and the compatibility with your HVAC system can help you make an informed decision when selecting a thermostat that suits your needs. In this article, we’ll break down the basics of thermostat wiring and help you determine how many wires you’ll need for a successful installation.
Tabe of Contents
- 1. Understanding Thermostat Wiring Basics: The Importance of Wires
- 2. Identifying the Wires: A Step-by-Step Guide for a Hassle-Free Installation
- 3. The Different Types of Thermostat Wires: Which One Should You Choose?
- 4. Wiring a Smart Thermostat: Things You Should Know Beforehand
- 5. Troubleshooting Common Thermostat Wiring Issues: Tips and Tricks
- 6. Benefits of Hiring a Professional Electrician for Thermostat Wiring Installation
- 7. Upgrading Your Thermostat: Adding New Wires and Changing Wiring Configurations
- People Also Ask
- Conclusion
1. Understanding Thermostat Wiring Basics: The Importance of Wires
When it comes to installing a thermostat, understanding the basics of wiring is essential. Wires serve as the pathway for the electrical signals that make your thermostat work and control the temperature in your home. Without the proper wiring, your thermostat won’t be able to communicate with your HVAC system, causing issues with your comfort and energy efficiency.
There are a few key things to keep in mind when it comes to thermostat wiring basics. First, it’s important to note that each wire has a specific purpose, and different wires are required for different types of thermostats. Secondly, the placement and color-coding of wires may vary depending on the make and model of your HVAC system, so it’s important to take note of any instructions provided by the manufacturer or consult a professional.
Additionally, it’s important to ensure that the wiring is correctly connected to the HVAC system and thermostat, and that all wires are properly secured and labeled. This will prevent any potential issues such as short circuits or electrical shock.
By understanding the importance of thermostat wiring and following proper installation procedures, you can ensure that your thermostat functions properly and helps to maintain a comfortable, energy-efficient home.
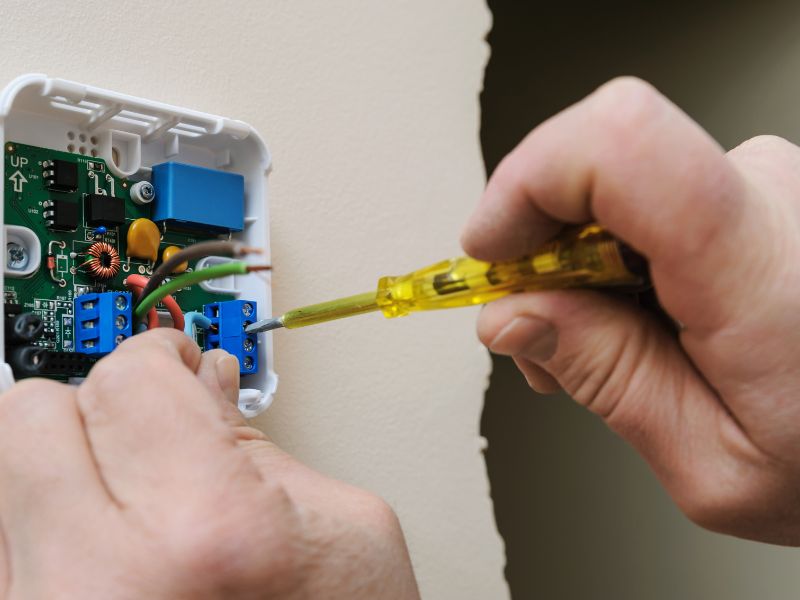
2. Identifying the Wires: A Step-by-Step Guide for a Hassle-Free Installation
Before you start with the installation of a thermostat, it’s crucial to identify the wires that are already installed to ensure a hassle-free installation. When identifying the wires, ensure that you use a voltage detector to ensure that the wires you are working with have no power running through them. This is essential for safety reasons, as dealing with live wires can lead to electric shocks and other accidents.
Here is a step-by-step guide to identifying the wires for a hassle-free installation:
1. Turn off the power: Before handling any wiring, make sure to turn off the power supply to the thermostat at the breaker box. This will help ensure your safety when working with electricity.
2. Remove the old thermostat: Remove the cover of the existing thermostat and remove the wires from their corresponding terminals. Take a picture of the wiring configuration before removing the wires to ensure you can refer to it later.
3. Identify the wires: The most common thermostat wires are the red (R), green (G), yellow (Y), and white (W) wires. The red wire is the power supply wire, while the yellow wire is the cooling system wire, the green wire is for the fan, and the white wire is for the heating system. However, the wiring configuration can differ from one HVAC system to another.
4. Label the wires: Label each wire according to its corresponding terminal. You can use sticky notes or masking tape to label each wire.
5. Check for additional wires: Some HVAC systems come with additional wires, such as a blue (C) wire, which is a power supply wire for smart thermostats. Ensure that you read the installation manual carefully to identify any additional wires that you may need for installation.
By identifying the wires beforehand, you can save time and avoid confusion during installation. With the wires labeled, you can easily refer to the wiring configuration to ensure you connect each wire to its corresponding terminal during installation.
3. The Different Types of Thermostat Wires: Which One Should You Choose?
Choosing the Right Thermostat Wire: Factors to Consider
When it comes to thermostat wiring, not all wires are created equal. Different types of wires are suitable for different HVAC systems and thermostat models. Some wires are designed to handle low voltage, while others are capable of carrying high voltage electrical currents. Your choice of thermostat wire will depend on several factors, including:
1. Compatibility with Your HVAC System
The first thing you need to consider when selecting a thermostat wire is whether it is compatible with your HVAC system. Different heating and cooling systems require different types of wires to ensure proper functioning. Some HVAC systems are low voltage, while others are high voltage. Before purchasing a thermostat wire, make sure you know the type of system you have and the specific wire requirements.
2. Wire Gauge and Length
Apart from compatibility with your HVAC system, you also need to consider the wire gauge and length. The gauge refers to the thickness of the wire and determines how much current it can handle. The length of the wire determines how much resistance the wire has; longer wires have more resistance, which can affect the efficiency of the thermostat. In general, thicker wires are better suited for longer distances, while thinner wires suffice for shorter distances.
3. Type of Insulation
The third factor to consider when choosing a thermostat wire is the type of insulation. The insulation on the wire protects it from damage and also helps to prevent electrical malfunctions. There are different types of insulation available, including PVC, thermoplastic, and high-temperature silicone. You need to select the type of insulation that can withstand the temperature and conditions in your HVAC system.
In summary, choosing the right thermostat wire requires careful consideration of several factors, including compatibility with your HVAC system, wire gauge and length, and type of insulation. By understanding the different types of wires available and their suitability for different situations, you can make an informed decision and ensure you have a hassle-free installation.
4. Wiring a Smart Thermostat: Things You Should Know Beforehand
Smart thermostats have revolutionized the way we control our home temperature. They offer features such as voice control, remote access, and advanced scheduling options. But before installing a smart thermostat, there are a few things you should know.
Compatibility with Your HVAC System
Not all smart thermostats are compatible with all HVAC systems. Before purchasing a smart thermostat, check the compatibility with your HVAC system. Some thermostats may require a specific number of wires or certain voltage that your HVAC system doesn’t support.
The Number of Wires You Need
Most smart thermostats require a minimum of four wires: two for power and two for control. However, some advanced models require a common wire (C-wire) which provides continuous power to the thermostat. If your existing wiring doesn’t include a C-wire, you can install an adapter or hire a professional electrician to add a new wire.
DIY vs. Professional Installation
While installing a smart thermostat may seem like an easy task, it involves wiring and electrical work, which can be dangerous if not done correctly. If you feel confident about your electrical skills and have experience with wiring, you can install the thermostat yourself by following the instructions provided with the product carefully. However, if you’re unsure or uncomfortable with handling electrical work, hiring a professional electrician is highly recommended.
Smart thermostats offer many benefits in terms of energy savings, convenience, and comfort. But before wiring a smart thermostat, make sure to check the compatibility with your HVAC system, determine the number of wires required, and consider the pros and cons of DIY vs. professional installation.
5. Troubleshooting Common Thermostat Wiring Issues: Tips and Tricks
Thermostat wiring issues can be frustrating, especially when they cause your HVAC system to malfunction. Fortunately, many common wiring problems are easy to diagnose and fix. Below are some tips and tricks to help you troubleshoot common thermostat wiring issues.
Check for Loose or Disconnected Wires
If your thermostat isn’t working correctly, the first thing you should do is check the wiring. A loose or disconnected wire could be the root of the problem. Check the wires behind the thermostat and at the HVAC system to see if any connections are loose or broken. Tighten any loose connections and reattach any disconnected wires.
Make Sure the Wires Are Connected Correctly
Another common wiring issue is connecting the wires incorrectly. Each wire has a specific function, and connecting them to the wrong terminals can cause your HVAC system to malfunction. Make sure you’ve connected the wires correctly by referring to the wiring diagram that came with your thermostat. If you don’t have the wiring diagram, search online for your specific thermostat model and download a copy.
Replace Damaged Wires
Over time, thermostat wires can become damaged, especially if they’re exposed to extreme temperatures or if they’re pinched or stretched. If you see any degraded or damaged wires, it’s best to replace them. You can buy thermostat wire at most home improvement stores, and it’s easy to install with a pair of wire cutters and a screwdriver.
These are just a few tips and tricks for troubleshooting thermostat wiring issues. If you’re unsure about any wiring problems, it’s always best to consult a professional electrician. A licensed electrician can diagnose and repair any wiring problems and ensure that your HVAC system is running smoothly.
6. Benefits of Hiring a Professional Electrician for Thermostat Wiring Installation
Why Hiring a Professional Electrician for Thermostat Wiring Installation is Important
Installing a thermostat may seem like a simple task, but it can be quite complex, especially when it comes to wiring. A common mistake homeowners make is attempting to install thermostats themselves, without seeking the help of a professional electrician. While some may be successful, most will end up with wiring issues or worse, damage to their HVAC systems. That is why hiring a professional is always recommended.
Here are the benefits of hiring a professional electrician for your thermostat wiring installation:
- Proper Wiring Techniques and Tools
- Compliance with Electrical Safety Codes
- Reduced Risks of Damage
Professional electricians have the necessary knowledge, skills, and tools for wiring HVAC systems correctly. They have undergone extensive training and have the experience needed to install high-end thermostats, which usually require advanced wiring techniques. With their expertise, electricians can ensure everything is correctly wired, reducing the risk of wiring issues in the future.
Another benefit of hiring an electrician is that they are familiar with electrical safety codes. There are specific codes and regulations that must be followed when wiring thermostats and HVAC systems. A licensed electrician will follow the required safety codes, ensuring a safe and secure installation.
Improper wiring of your HVAC system can cause significant damage to your HVAC equipment, increasing the cost of repairs down the line. It can also potentially pose a danger to your home and those living in it. A professional electrician will ensure that the wiring is done right, reducing the risks of damage to your HVAC system and your home.
In conclusion, hiring a professional electrician for your thermostat wiring installation is the best decision you can make. It will ensure the proper installation of your thermostat, compliance with electrical safety codes, and reduced risks of damage. Investing in the services of a licensed electrician saves you time, resources, and prevents future wiring issues.
7. Upgrading Your Thermostat: Adding New Wires and Changing Wiring Configurations
If you’ve decided to upgrade your thermostat, you may need to add new wires or change your existing wiring configuration. This can be a bit more complicated than a standard thermostat installation, but with a little bit of know-how, you can get it done.
Adding New Wires
If you need to add new wires for your thermostat, you’ll need to determine how many wires you need and what type of wires you need. Generally, you’ll need one wire for each function of your thermostat: one for heating, one for cooling, and one for fan control. However, if you’re upgrading to a smart thermostat, you may need additional wires for features such as power and data communication.
Once you know how many wires you need, you’ll need to run them from your thermostat location to your HVAC system. This can involve cutting holes in walls or running wires through your attic or crawl space, so it’s important to know what you’re doing or hire a professional electrician to help.
Changing Wiring Configurations
If you’re changing your wiring configuration, you’ll need to identify your existing wires and determine their functions. This may involve tracing wires through your system or consulting your HVAC system’s user manual. Once you know what each wire does, you can reconfigure them to match your new thermostat’s requirements.
It’s important to note that changing your wiring configuration can be tricky and may require advanced electrical knowledge. If you’re not comfortable with this type of work, it’s best to hire a professional electrician to help with your upgrade.
Upgrading your thermostat can be a great way to improve the comfort and energy efficiency of your home. Just remember to take your time, do your research, and don’t be afraid to hire an expert if you need help.
People Also Ask
1. What are the different types of wires needed for a thermostat?
A thermostat typically requires three types of wires: power wires (usually red), ground wires (usually green), and control wires (usually white or yellow).
2. Can a thermostat work with only two wires?
Yes, a thermostat can work with only two wires if the heating system has a fan-forced heater, baseboard heater, or radiant floor heating.
3. Do you need a C wire for a thermostat?
A C wire is not always necessary for a thermostat to function, but it is recommended for consistent power supply and to prevent battery drain. Some newer thermostats come with a power extender kit that eliminates the need for a C wire.
4. How can you tell if your thermostat has enough wires?
Check the wiring diagram of your thermostat and compare it to the number of wires available at your heating and cooling system. If there are not enough wires, you may need to install a new thermostat or consult a professional.
5. Can you use a thermostat without a common wire?
You can use a thermostat without a common wire by installing a power extender kit or using batteries. However, the lack of a common wire can cause issues with inconsistent power supply and short battery life.
Conclusion
Overall, the number of wires needed for a thermostat can vary depending on the heating and cooling system. It is important to refer to the wiring diagram of the thermostat and consult a professional if necessary to ensure proper installation and function. Additionally, considering a C wire or power extender kit can provide consistent power supply and prevent potential issues.

AC Maintenance Supervisor
Ethan’s dedication to routine maintenance and duct cleaning ensures your AC systems remain in top-notch condition. His meticulous approach guarantees efficiency and longevity for your cooling units.