
As summer heats up and winter approaches, you may be contemplating upgrading your home’s heating and cooling system with a programmable thermostat. These little gadgets are designed to automate your home’s temperature control by adjusting heating and cooling systems at specified times and can save you money on your energy bills. But is it possible to install a new thermostat yourself, or should you hire a professional? In this article, we’ll explore the ins and outs of thermostat installation and help you decide if it’s a DIY project or one that requires the assistance of a professional.
Tabe of Contents
- 1. “Ways to Determine Whether Installing a Thermostat Yourself is Safe”
- 2. “The Pros and Cons of Do-It-Yourself Thermostat Installation”
- 2.
- 3. “The Different Types of Thermostats and Their Installation Requirements”
- 4. “Necessary Tools and Equipment for DIY Thermostat Installation”
- 5. “A Step-by-Step Guide to Installing Your Own Thermostat”
- 6. “The Importance of Testing and Calibrating Your New Thermostat”
- 7. “Tips for Troubleshooting Common Thermostat Installation Problems
- People Also Ask
- Conclusion
1. “Ways to Determine Whether Installing a Thermostat Yourself is Safe”
1.
Installing a thermostat is one of the relatively straightforward HVAC projects that homeowners can perform without calling a professional. However, it’s essential to determine whether installing a thermostat yourself is safe and worth the effort. Here are some ways to determine whether a DIY thermostat installation project is safe.
1. Check your local building codes: Before deciding to install a thermostat yourself, it’s crucial to check your local building codes. Some states may require you to hire a licensed HVAC contractor to handle thermostat installation projects and other HVAC tasks. Failure to comply with local codes and regulations can lead to costly fines, damages, or safety hazards.
2. Evaluate your skills and experience: Although installing a thermostat may seem like an easy task, it requires some basic electrical skills and knowledge. If you’re not comfortable and experienced in handling electrical wiring, it’s best to hire a professional. Mishandling wires and components can cause serious injuries, fires, or damage to your HVAC system.
3. Check the compatibility and requirements of your new thermostat: Before buying a new thermostat, it’s crucial to check its compatibility with your current HVAC system. Some thermostats require specific equipment or wiring configurations that may not be compatible with your HVAC system. Failing to check the compatibility and requirements of your new thermostat can lead to HVAC system malfunctions, energy waste, and other issues.
In summary, DIY thermostat installation projects offer several benefits, including cost-savings and convenience. However, it’s crucial to evaluate your skills, local codes, and the compatibility and requirements of your new thermostat before proceeding with the project. If you’re unsure or have any doubts, it’s best to contact a licensed HVAC contractor for professional installation services.
2. “The Pros and Cons of Do-It-Yourself Thermostat Installation”
2.
Installing a thermostat yourself definitely has its advantages, but it also comes with its own set of challenges. Here are some pros and cons of DIY thermostat installation:
Pros
- Cost-efficient: The most significant advantage of DIY thermostat installation is its cost-effectiveness. You don’t have to pay for professional installation fees, which means you can save a considerable amount of money.
- Freedom and control: Installing a thermostat yourself means you can choose the location, type, and brand of the thermostat you want to install. You have the freedom and control to customize your home’s heating and cooling system to your liking.
- Learning opportunity: DIY projects provide learning opportunities. Installing a thermostat can help you learn more about HVAC systems and how they work, which can inspire you to take on more DIY projects in the future.
Cons
- Costly mistakes: DIY thermostat installation can end up costing you more than professional installation fees if you make costly mistakes. Any mistakes made during installation can damage your HVAC system, leading to expensive repair and replacement costs.
- Time-consuming: Installing a thermostat yourself can also be time-consuming, especially if you’re doing it for the first time. You may need to spend hours researching and preparing before you can start the installation process.
- Risk of injury: Thermostat installation involves working with electrical wiring, which can pose a risk of electrocution or fire if not handled correctly. If you’re not confident in your abilities to handle electrical wiring, it’s best to leave the installation to a professional.
Before deciding whether to install a thermostat yourself or hire a professional, consider these pros and cons carefully. If you’re confident in your abilities and have experience working with HVAC systems, then DIY installation may be a great option for you. However, if you’re not comfortable working with electrical wiring or if you have a more complex HVAC system, it’s best to leave the installation to professionals.
3. “The Different Types of Thermostats and Their Installation Requirements”
When it comes to choosing a thermostat for your home, there are several types to consider. Each type has its own set of features and installation requirements that factor into the decision-making process.
1. Programmable Thermostats
Programmable thermostats allow you to set a schedule for your heating and cooling system. They can be programmed to turn on and off automatically at specific times during the day or week. This type of thermostat can help save energy and money by reducing the amount of time your HVAC system runs when you’re not at home.
2. Wi-Fi Thermostats
Wi-Fi thermostats allow you to control the temperature of your home from your smartphone or computer. These thermostats also offer advanced features like energy usage tracking and the ability to create custom schedules. Wi-Fi thermostats require an internet connection and may require professional installation if you’re not comfortable with installing it yourself.
3. Smart Thermostats
Smart thermostats are the most advanced type of thermostat on the market. They use machine learning to learn your temperature preferences and automatically adjust the temperature based on your habits. They also offer features like voice control and integration with other smart home devices. Smart thermostats typically require professional installation.
When it comes to installation requirements, each type of thermostat may have different wiring needs and installation instructions. It’s important to carefully read the installation manual and follow all safety guidelines to ensure a safe and effective installation. If you’re not comfortable installing a thermostat yourself, it’s best to leave it to a professional HVAC technician.
4. “Necessary Tools and Equipment for DIY Thermostat Installation”
Installing a thermostat requires specific tools and equipment to get the job done. DIY enthusiasts who want to install their own thermostat must have the following essential items for the job.
- A thermostat: This is the most crucial item for a successful DIY thermostat installation project. There are different types of thermostats available in the market, including smart thermostats, programmable thermostats, and manual thermostats. Choose the right type of thermostat to suit your needs and home heating and cooling system.
- A screwdriver (Phillips or flat-head): A screwdriver is essential for removing the old thermostat and installing the new one. Make sure to use the right size screwdriver to avoid damaging the screws or thermostat housing.
- Wire cutters/strippers: Wire cutters or strippers are needed to remove the insulation from the wires and prepare them for connection to the new thermostat.
- Electrical tape: Electrical tape is used to secure the wires and prevent accidental contact that could cause a short circuit.
- A drill: A drill is necessary for drilling holes in the wall to fix the new thermostat plate onto.
- Wall anchors and screws: Wall anchors and screws are used to fix the thermostat plate securely to the wall.
- A level: A level is needed to ensure that the thermostat plate is mounted evenly on the wall.
- A voltage tester: A voltage tester is crucial for checking the voltage on the wires before connecting the new thermostat to avoid damaging the thermostat or your home heating system.
It’s essential to ensure that you have all the necessary tools and equipment before starting the DIY thermostat installation project to avoid unnecessary delays or damage. If you’re uncertain about the tools and equipment you need to install your thermostat, seek the advice of an HVAC professional or refer to the manufacturer’s instructions for guidance.
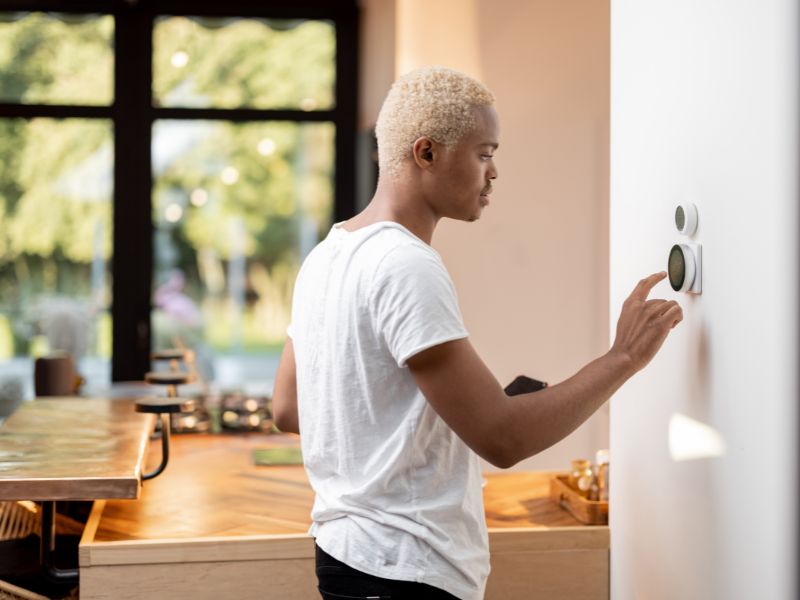
5. “A Step-by-Step Guide to Installing Your Own Thermostat”
5.
Installing a thermostat may sound daunting, but with the right tools and instructions, it can be a simple process. Here is our step-by-step guide for a smooth installation.
Step 1: Turn Off Power
Before you begin, turn off the power to your HVAC system to avoid any electrical accidents. You can do this by turning off the power switch or circuit breaker connected to the furnace or air conditioner.
Step 2: Remove the Old Thermostat
Remove the cover of your old thermostat and unscrew it from the wall plate. Carefully disconnect the wires from the old thermostat and label them to match the terminals on the new thermostat.
Step 3: Install the New Thermostat Base
Mount the new thermostat base to the wall using screws and a level, making sure it is level and flush against the wall. Run the wires through the baseplate and connect them to their respective terminals, making sure to follow the manufacturer’s wiring diagram.
Step 4: Attach the Thermostat Cover
Snap the thermostat’s cover onto the base and secure it with screws or clips if necessary. If your thermostat requires batteries, install them at this time.
Step 5: Power Up the HVAC System and Program the Thermostat
Turn the power back on and test the thermostat by turning on your HVAC system. Follow the manufacturer’s instructions to program your new thermostat and adjust the temperature settings to your liking.
Remember to test and calibrate your new thermostat periodically to ensure accurate temperature readings and proper function. If you encounter any issues during the installation process, refer to the troubleshooting section of the manufacturer’s manual or seek professional assistance.
6. “The Importance of Testing and Calibrating Your New Thermostat”
After installing your new thermostat, it is crucial to test and calibrate it to make sure it is working properly. This will ensure that your HVAC system functions efficiently and saves you money on energy bills. Here are some steps you can follow to test and calibrate your new thermostat.
1. Turn on Your HVAC System
Begin by turning on your HVAC system to check if the thermostat is correctly paired with your heating and cooling systems. Make sure the furnace turns on when heating is selected, and the air conditioner turns on when cooling is selected.
2. Check the Temperature Accuracy
Check the thermostat’s accuracy by placing a thermometer next to it and comparing the temperatures indicated by both devices. If the temperature readings differ by more than a degree or two, you may need to calibrate the thermostat.
3. Adjust the Temperature Settings
Once you have confirmed the temperature accuracy, adjust the temperature settings to your desired temperature and make sure the HVAC system responds accordingly. Wait a few minutes to see if the system turns on and off as needed.
4. Calibrate the Thermostat
If the temperature readings don’t match, you can adjust the calibration settings on your thermostat. Refer to the manufacturer’s instructions on how to calibrate the thermostat. You may need to press some buttons or turn a dial to fine-tune the temperature readings.
In summary, testing and calibrating your new thermostat is essential for ensuring your HVAC system functions efficiently. If you face any issues during the testing process, don’t hesitate to contact a professional HVAC technician for assistance.
7. “Tips for Troubleshooting Common Thermostat Installation Problems
7.
If you’ve gone ahead and installed your own thermostat, but something isn’t working quite right, there might be a few common issues that you’re encountering. Here are some tips for troubleshooting some of the most common thermostat installation problems that homeowners face.
1. Double-Check Wiring Connections
One potential issue that could cause problems is incorrect wiring connections. Make sure that all the wires are properly connected to both the thermostat and the HVAC system. Sometimes wires can come loose or be connected to the wrong terminal, so check your wiring diagram and re-connect everything if necessary.
2. Check for Power Supply
Another problem could be a lack of power supply. Make sure that the thermostat is receiving power from the HVAC system or the power source. Check circuit breakers, fuses, and wiring connections to ensure that power is running to the thermostat.
3. Check the Settings
It’s also possible that you may have inadvertently set the wrong temperature settings. Double-check that the thermostat’s settings are correct and that the desired temperature is properly programmed. Additionally, ensure that the settings are appropriate for your HVAC system, as certain systems may require unique programming options.
4. Calibrate the Thermostat
If you’ve ruled out all of the previous issues, then calibrating the thermostat may be necessary. The calibration process will ensure that your thermostat is measuring and maintaining temperature accurately. Follow the manufacturer’s instructions for calibrating your specific thermostat.
By following these tips, you’ll be able to troubleshoot some of the most common thermostat installation problems. However, if you still can’t get your thermostat to work correctly, it may be time to call in a professional to identify and fix the issue.
People Also Ask
1. How difficult is it to install a thermostat?
Installing a thermostat can range from being an easy DIY job to a complex installation requiring professional help. However, if you have basic knowledge of wiring and electrical systems, it is possible to install a thermostat yourself.
2. Do I need any special tools to install a thermostat?
You may need a few basic tools like a screwdriver, pliers, wire cutters, and wire strippers to install a thermostat. Some thermostats come with their own installation tools and hardware, so check the package before buying tools.
3. Can I replace an old thermostat with a new one?
Yes, you can replace an old thermostat with a new one. However, you need to make sure that the new thermostat model is compatible with your HVAC system and wiring. If you are unsure, it’s recommended that you hire a professional.
4. Do I need to turn off the power before installing a thermostat?
Yes, before installing a thermostat, turn off the power to the HVAC system at the electrical breaker or fuse box. This will prevent any electrical shock and protect the HVAC system and the thermostat.
5. What if I make a mistake during installation?
If you make a mistake during installation, it can cause damage or malfunction of the HVAC system or the thermostat. In case of any confusion or doubt, it’s recommended that you seek professional help.
Conclusion
Installing a thermostat yourself can save you money and give you a sense of accomplishment. However, it’s important to consider your experience level and whether you feel comfortable working with electrical systems. If you’re unsure or have any doubts, it’s recommended that you hire a professional to ensure a safe and successful installation.

Emergency Services Coordinator
Oliver leads our round-the-clock emergency repair services. His swift response and problem-solving skills provide peace of mind during urgent AC breakdowns, making your comfort his priority.